Howto create yellow and red card hooks & templates, one using variant scenes and a scene override
'
Caveat: You need to have Template Editor permissions. It may be sensible when naming new hooks, new templates or new template sets to add "TRAINING" as part of the name, to differentiate your work from ''live'' production work. Do consider any ''Delete'' actions carefully - is it your work you are deleting?
Single Card
An example of the completed graphic:
'
Prerequisites
Prior to beginning this article, the user should be familiar with selecting a schema and creating hooks. Also to have completed the following articles:
The requirements from the user side are to be able to simply choose from a drop-down list at what point during the timeline of the match to create an instance for. The list of options should include:
An abbreviation of the team
The time of the card
The name of the player
The penalty level of the card, i.e. Yellow, 2nd Yellow or Red
Creating the Hooks
Using Ignition Post Win Client as a Template Editor
Click within the Lookup field and select: 'mepvsat' and select: Description'
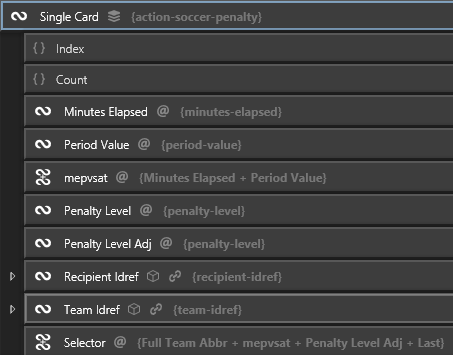
Ensure 'Single Card' is selected, create sub-hook to the following node:
action-soccer-penalty.penalty-level
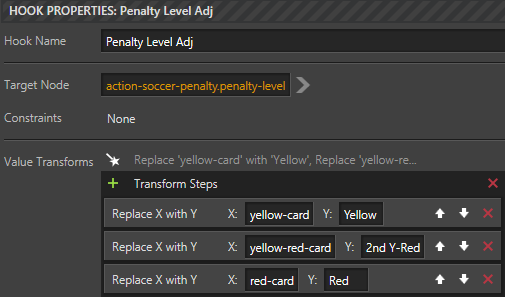
Create a second sub-hook to action-soccer-penalty.penalty-level
Rename: Penalty Level Adj
Add the following Transform Steps:
Replace X with Y, where X = 'yellow-card' and Y = 'Yellow'
Replace X with Y, where X = 'yellow-red-card' and Y = '2nd Y-Red'
Replace X with Y, where X = 'red-card' and Y = 'Red'
Ensure 'Single Card' is selected, create sub-hook to the following node:
action-soccer-penalty.recipient-idref
Set 'Reference' to 'All Players' and click 'Create Hooks'
Ensure 'Single Card' is selected, create sub-hook to the following node:
action-soccer-penalty.team-idref
Set 'Reference' to 'All Teams' and click 'Create Hooks'
Click 'Add Composite Hook'
Rename: Selector
Add the following component hooks:
Single Card.Team Idref.Full Team Abbr
mepvsat
Single Card.Penalty Level Adj
Single Card.Recipient Idref.Last
Change the 'Composite Mode' to: Format String
Enter the following in 'Format':
{0}-{1}'- {2} -{3}
Adding a scene
Select the main tab TEMPLATES
Ensure the template set 'TRAINING Match' is selected (above 'Search Templates')
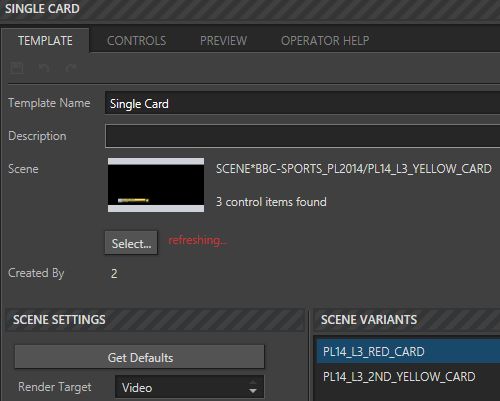
Click 'Add new Template to TRAINING Match'
Rename: 'Single Card'
Click the 'Select' button adjacent to 'Scene'
Note you have a pane to the right-hand side:
BROWSE SCENES
With: Renderer Domain Graphics Hub
And a list of your available scenes below 'Search'
Ensure 'Renderer Domain: Viz
Ensure Graphics Hub: Post --- (Or the name of what is pointing at your available Viz Scenes)
Type the following into the 'Search' bar: PL14_L3_YELLOW_CARD
You may get more than one option of where a scene is available.
Select and expand: BBC-SPORTS_PL2014
Find the above scene: PL14_L3_YELLOW_CARD
Click 'Refresh Thumbnail and Scene Controls'
Click 'Click button to make this the current main scene'
Find the following scene: PL14_L3_RED_CARD
Click 'Refresh Thumbnail and Scene Controls'
Click 'Click button to make this a variant scene'
Find the following scene: PL14_L3_2ND_YELLOW_CARD
Click 'Refresh Thumbnail and Scene Controls'
Click 'Click button to make this a variant scene'
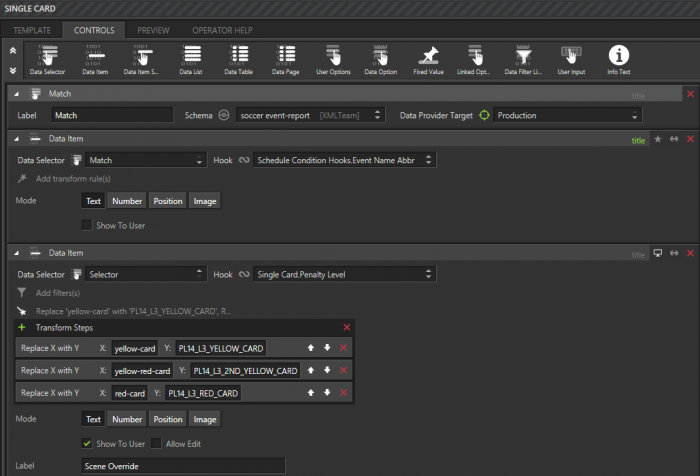
Select the sub-tab CONTROLS, add a 'Data Selector' control
Rename the Label: 'Match'
Select the Schema: 'soccer event-report'
Add a 'Data Item' control
Choose the 'Schedule Condition Hooks.Event Name Abbr' hook
Click the greyed out 'title' on the control -- it turns 'green'
This sets the Title of the Graphic to the data returned from the control.
Add a 'Data Item' control
Above SCENE CONTROL OBJECTS there are seven more controls, which can be used in your templates. For example, the far right is a Scene Override control. These are known as behavioural controls and you can bind them by dragging them to the 'star' icon next to the 'double-headed-arrow' icon.
Using a behaviour control bind as follows: Scene Override
Hook = 'Single Card.Penalty Level'
Change Data Selector to: 'Selector'
TICK 'Show To User'
Change the 'Label' to: Scene Override
Add the following Transform Rules:
Replace X with Y, where X = 'yellow-card' and Y = 'PL14_L3_YELLOW_CARD'
Replace X with Y, where X = 'yellow-red-card' and Y = 'PL14_L3_2ND_YELLOW_CARD'
Replace X with Y, where X = 'red-card' and Y = 'PL14_L3_RED_CARD'
N.B. When you bind a Viz Control to a template control the template control will automatically be renamed to the Viz Control - but it's always good practice to give it a more meaningful name.
This will change the scene, i.e. it will override the main scene and select an alternate scene.
For example, the Scene Variants (i.e. PL14_L3_RED_CARD & PL14_L3_2ND_YELLOW_CARD, vary only slightly to the main scene: PL14_L3_YELLOW_CARD. The options for this graphic are for it to be a yellow card, a second yellow becoming a red or a red card.
Because each of these modes represents different scenes, but they are so similar in functionality, they can be defined as Scene Variants. It is, therefore, possible to automate the selection of the appropriate scene to use from the Template by selecting the relevant Variant from a Control bound to Scene Override. When bound to a Control it will automatically populate the options with the list of Scene Variants specified for the Template.
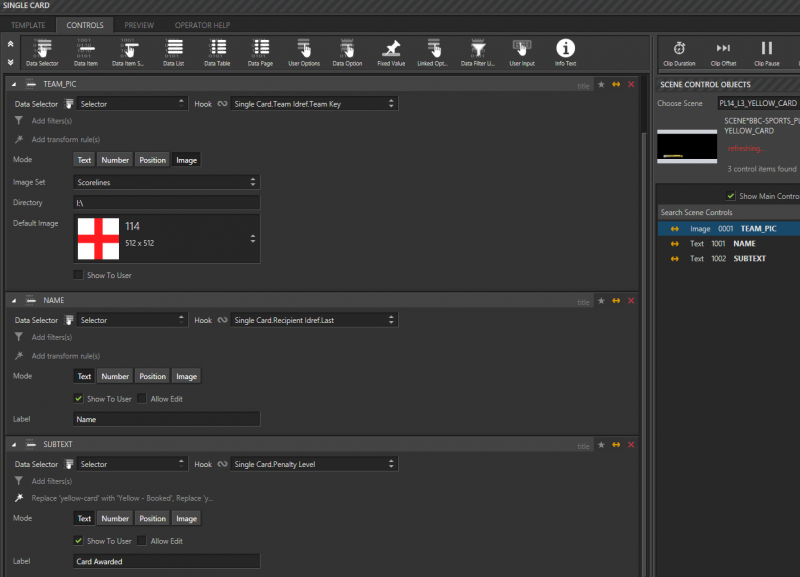
The below image shows the three template controls so far:
Now to add the controls that map to the hooks you created.
Add a 'Data Item Selector' control
Change Label to: 'Selector'
Set the 'List Hook' as: 'Single Card'
Change 'Id (Value)' to: 'Index'
Change 'Display' to: 'Selector'
Click the greyed out 'title' on the control -- it turns 'green'
You should have an image set with the logo for each premier league football team. For the remainder of the tutorial, this will be referred to as the image set - 'Scorelines'.
Add a 'Data Item' control
Bind to: Image 0001 TEAM_PIC
Change Data Selector to: 'Selector'
Hook = 'Single Card.Team Idref.Team Key'
Image Set = 'Scorelines'
Add a 'Data Item' control
Bind to: Text 1001 NAME
Change Data Selector to: 'Selector'
Hook = 'Single Card.Recipient Idref.Last'
TICK 'Show To User'
Change the 'Label' to: Name
Add a 'Data Item' control
TICK 'Show To User'
Bind to: Text 1002 SUBTEXT
TICK 'Show To User'
Change the 'Label' to: Card Awarded
Change Data Selector to: 'Selector'
Hook = 'Single Card.Penalty Level'
Add the following Transform Rules:
Replace X with Y, where X = 'yellow-card' and Y = 'Yellow - Booked'
Replace X with Y, where X = 'yellow-red-card' and Y = '2nd Yellow (Red) - Sent Off'
Replace X with Y, where X = 'red-card' and Y = 'Red - Sent Off'
Change the 'Data Selector' of the Scene Override (Data Item') to ' Selector' (Not 'Match')
The below image shows the three template controls you just created:
'
Now to use the template to create a graphic.
Using the Web Client to view your new template. Remember to Login as a Template Editor, as the template is not yet published.
Login as a Template Editor (the template is not published)
Select the template set: TRAINING Match
Select the Sample Data:
SampleData - soccer event-report - Southampton v Leicester City.xml
Select the template: Single Card
The data goes to the first instance, in this case, a yellow card given to Højbjerg.
The ''Scene Override'' field is populated with the following (because it is a yellow card):
PL14_L3_YELLOW_CARD
As per the image below:
'
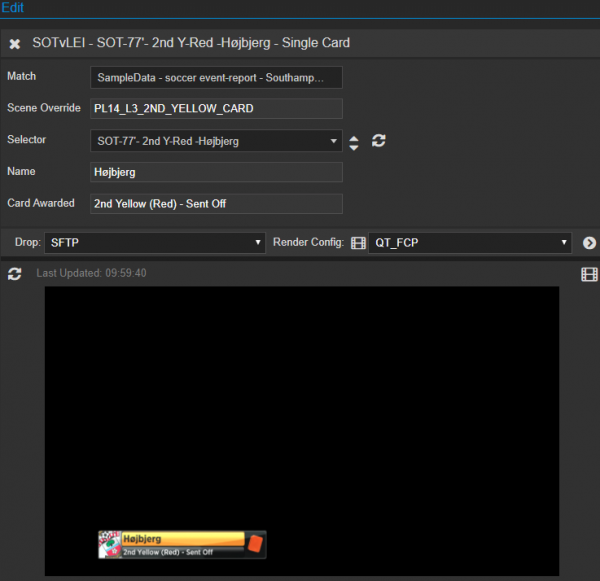
Using the dropdown in the 'Selector' field, change the data instance (from the sample date) from "SOT-26'- Yellow -Højbjerg" to:
"SOT-77'- 2nd Y-Red -Højbjerg"
The 'Scene Override' field is populated with the following (because it is a second yellow card):
PL14_L3_2ND_YELLOW_CARD
As per the image below:
You will need to switch to different sample data to see an instance of a 'straight' red card being issued and the resulting scene override.
Select the Sample Data:
SampleData - soccer event-report - Burnley v Manchester United.xml
Select the template: Single Card
The data goes to the first instance, in this case, a yellow card given to McNeil.
The 'Scene Override' field is populated with the following (because it is a yellow card):
PL14_L3_YELLOW_CARD
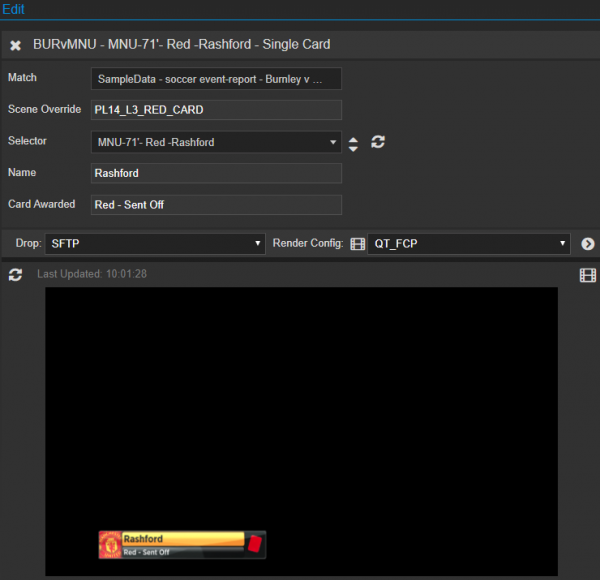
Using the dropdown in the 'Selector' field, change the data instance (from the sample date) from "BUR-52'- Yellow -McNeil" to:
"MNU-71'- Red -Rashford"
The 'Scene Override' field is populated with the following (because it is a red card):
PL14_L3_RED_CARD
As per the image below:
Now to use a different scene. Return to the Win Client.
Select the main tab TEMPLATES
Ensure 'Single Card' is highlighted
Below the TEMPLATE pane, rename 'Old Single Card'
Save
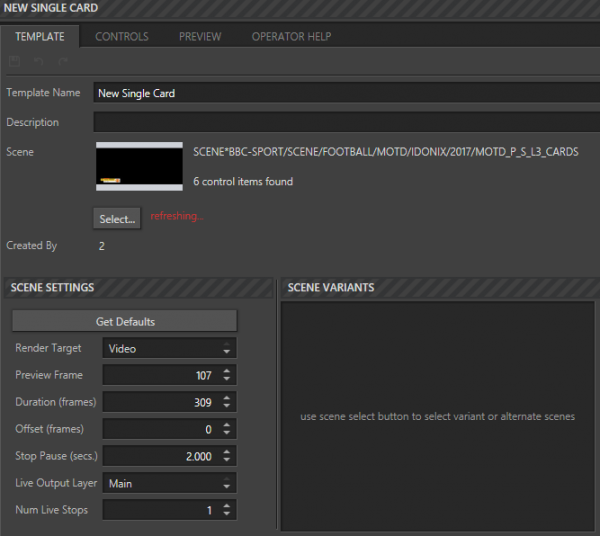
Click 'Clone Template'
Rename: 'New Single Card'
You will note from the above image you have a new scene and the pane below SCENE VARIANTS is empty.
Below BROWSE SCENES
Expand BBS-SPORT/SCENE/FOOTBALL/MOTD/IDONIX/2017
Ensure 'MOTD_P_S_L3_CARDS' is highlighted
Click 'Click button to make this the current main scene'
Highlight each of the following and then click 'Delete':
PL14_L3_RED_CARD
PL14_L3_2ND_YELLOW_CARD
The new scene control objects will need to Bind appropriately.
To the first 'Data Item' (i.e. the one with the 'Scene Override' Bind):
Bind to: CARDS 1-Y 2-R 3 DY
Replace the Y values in the three 'Replace X with Y' as follows: 'yellow card' = 1, 'yellow-red-card' = 3 & 'red-card' = 2
Replace TEAM_PIC with:
FLAG
Replace NAME with:
LINE1
Replace SUBTEXT with:
LINE2
Add two 'user Option' controls, Bind each as follows:
BBC_NO_BBC
BADGE_NO_BADGE
Using the Web Client (as a Template Editor).
Select the template set: TRAINING Match
Select the Sample Data:
SampleData - soccer event-report - Southampton v Leicester City.xml
Select the template: New Single Card
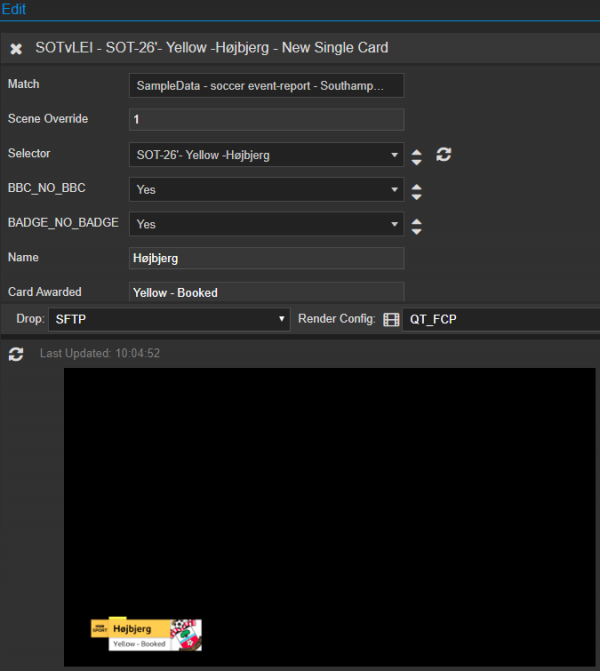
The data goes to the first instance, in this case, a yellow card given to Højbjerg.
The 'Card Awarded' field is populated with the following (because it is a yellow card):
'Yellow Booked'
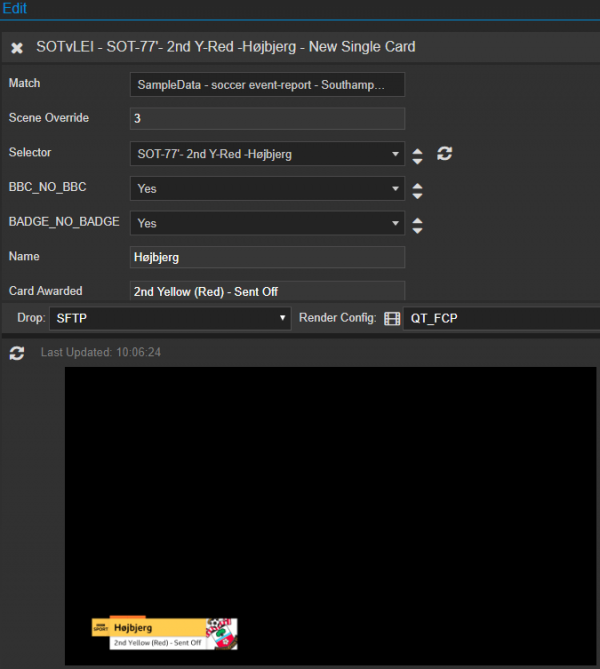
Using the dropdown in the 'Selector' field, change the data instance (from the sample date) from "SOT-26'- Yellow -Højbjerg" to:
"SOT-77'- 2nd Y-Red -Højbjerg"
The 'Card Awarded' field is populated with the following (because it is a second yellow card):
2nd Yellow (Red) - Sent Off
You will need to switch to different sample data to see an instance of a 'straight' red card being issued.
Select the Sample Data:
SampleData - soccer event-report - Burnley v Manchester United.xml
Select the template: New Single Card
The data goes to the first instance, in this case, a yellow card given to McNeil.
The 'Card Awarded' field is populated with the following (because it is a yellow card):
'Yellow Booked'
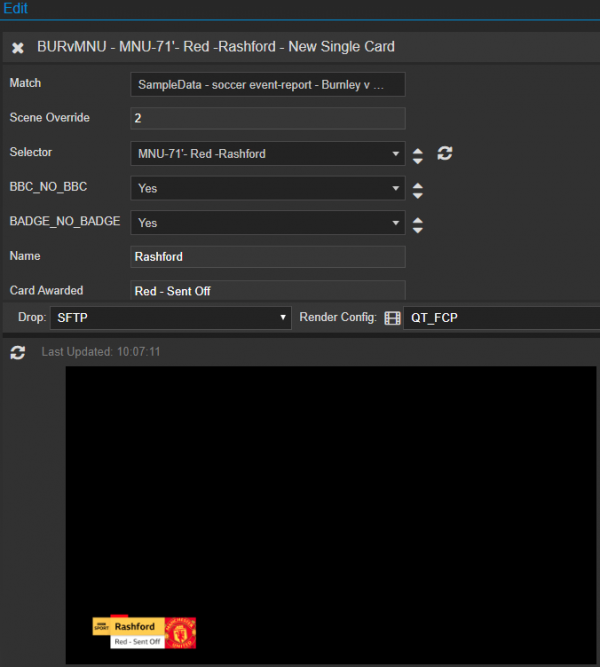
Using the dropdown in the 'Selector' field, change the data instance (from the sample date) from "BUR-52'- Yellow -McNeil" to:
"MNU-71'- Red -Rashford"
The 'Card Awarded' field is populated with the following (because it is a red card):
Red - Sent Off
You will notice the new viz scene simply deals with the different instances without the need for 'Variant Scenes' as used in the 'Single Card' template.
'
Have you tried the tutorial to produce a Single Substitution graphic, available at the link below: