Caveat: You need to have Template Editor permissions. It may be sensible when naming new hooks, new templates or new template sets to add "TRAINING" as part of the name, to differentiate your work from 'live' production work. Do consider any 'Delete' actions carefully - is it your work you are deleting?
Predecessors
You need to have completed the tutorial 'User Input Node' functionality.
User Input Nodes
Using Ignition Post Win Client as a Template Editor
Select the main tab DATA
Select the sub-tab DATA PROVIDERS
Ensure XMLTeam is selected
Select the sub-sub-tab SCHEMAS & SEARCHES
Below SCHEMAS, select the 'soccer event-report' schema
Now ensure the 'USER INPUT DATA' sub-tab is selected in the right-hand pane
Expand 'sports-content'
Expand 'sports-metadata'
The tutorial 'Creation of hooks using the 'User Input Node' functionality' will have created some user input nodes.
Check the following are in place:
Node Label: Commentator Name
Node Name: commentator
Input Type: Options
Node Label: Validate
Node Name: validate
Input Type: Bool
'Default Value': false
Node Label: Home Team Kit
Node Name: homekit
Input Type: Options
Node Label: Away Team Kit
Node Name: awaykit
Input Type: Options
Node Label: FA Colour Strip
Node Name: facolour
Input Type: Options
The Schema
Select the main tab DATA
Select the sub-tab SCHEMAS & HOOKS
Below SCHEMAS:
Data Provider: XMLTeam
Target: Production
Schema: soccer event-report
Sample Data: SampleData/soccer event-report/Southampton v Leicester City.xml
Create a Template
Select the main tab TEMPLATES and ensure 'All Templates' is selected
From within the 'Search Template' pane, click 'Add new Template to All Templates'
Within the TEMPLATE sub-pane, rename: User Input Node Hooks
Click 'Select'
In the right-hand side sub-pane BROWSE SCENES:
Ensure Renderer Domain = Viz
Ensure Graphics Hub = Post
Expand: 000_MY_TEST
Highlight: 3_Line
Click 'Refresh Thumbnail and Scene Controls'
Click 'Click button to make this the current main scene'
In the sub-tab CONTROLS, below 'SCENE CONTROL OBJECTS':
Choose Scene: 3_Line
You will notice the 'Scene Control Objects' in the sub-pane, below 'Search Scene Controls':
Richtext 1001 Full_1
Richtext 1002 Full_2
Richtext 1003 Full_3
Beside each of the scene control objects, there is a 'double-headed arrow' icon
Below the main pane, add a 'Data Selector' control
Set Schema to: soccer event-report [XMLTeam]
Add a 'Data Item' control
Set the Hook to: User Input Node Hooks.Commentator
TICK 'Show To User'
You will notice the template control (i.e. Data Item) has a greyed out 'double-headed arrow' icon.
If you hover the mouse over the icon: 'Drag a scene control here to bind'
To be able to match a scene control object to a template control, you need to BIND the two controls. This is achieved by doing exactly as the icon hinted. By clicking the mouse on to the icon of the scene control object and "dragging" it to the icon on the template control. You will know when you have been successful - it turns yellow.
BIND the 'Data Item' template control to the scene control object: 'RichText 1001 Full_1'
Add a 'Data Item' control
Set the Hook to: User Input Node Hooks.Homekit
TICK 'Show To User'
BIND to 'RichText 1002 Full_2'
Add a 'Data Item' control
Set the Hook to: User Input Node Hooks.Validate
TICK 'Show To User'
BIND to 'RichText 1003 Full_3'
Web Client
Using the Web Client to view your new template. Remember to Login as a Template Editor, as the template is not yet published.
In the 'Templates' pane, select the set: User Input Node Hooks
Ensure the sample data is selected, i.e. SampleData - soccer event-report - Southampton v Leicester City
Select the 'User Input Node Hooks' template
The Edit' pane will populate.
Note in the 'Edit' pane the lower sub-pane can display either a 'Preview' of the graphic or it can show you the data being provided to the graphic, i.e. a 'Dataview'. You can simply switch between these two views by clicking the button in the top right-hand corner of the sub-pane
The 'Edit' pane 'data view' pane is populated with:
Data Output
1001: _ ?
1002: _ ?
1003: false
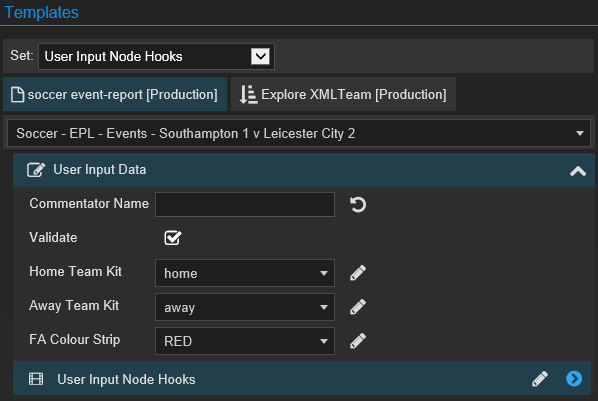
In the 'Templates' pane, from within the 'User Input Data' sub-pane, change the following:
Commentator Name, from the options select: Steve Wilson
Validate, TICK --- this makes the boolean 'true'
Home Team Kit, home
Away Team Kit, away
FA Colour Strip, RED
Data Output
1001: Steve Wilson
1002: home
1003: true
Note there is a 'pencil icon' adjacent to each field. Hovering the mouse will show 'Override'. This is because each of the user input nodes during their creation had the 'Allow Override' TICKED.
From within the 'User Input Data' sub-pane, click the following:
the 'Override' icon adjacent to 'Commentator Name'
The icon changes to 'Revert to options' and the field empties allowing new text to be entered.
A scenario for when 'Override' may be needed. For an Operator to make edits to a graphic if the 'Commentator Name' is not one of the options entered during the creation of the user input node.
A scenario for the 'Validate' user input node. A condition can be applied to templates included in an automated template set. The condition could be that the template is only used when the condition is met - in this instance when an Operator has changed the boolean setting from 'false' to 'true'.
Information about what version of the strip a team is wearing is not normally provided by the XML data provider, it is also a decision often made only shortly before a game. Here an Operator can choose from the options of a strip. This information is required to ensure relevant graphics (e.g. formation) can reflect the strip being worn. NOTE - The 'FA Colour Strip' can be used to differentiate the background settings for teams for which imagery is not held.