Using Ignition Post Win Client as a Template Editor.
From the main tabs select: DATA
From the sub-tabs select: SCHEMAS & HOOKS
There are three main panes:
Within SCHEMA make the following selections:
Data Provider: XMLTeam
Target: Production
Schema: soccer event-report
Sample Data: Southampton v Leicester City
From the main tab DATA select the sub-tab:
DATA PROVIDERS
In the left 'Search Data Providers' pane, select:
XMLTeam
The main view has information about the URL etc. Below that is the SCHEMA & SEARCHES pane, which has three sub-tabs:
SCHEMAS
SEARCHES
SCHEDULES
Below the sub-tab SCHEMAS, select the 'soccer event-report' schema
The greyed out pane has now populated with two tabs:
DATA SUBSETS
USER INPUT DATA
Select the 'USER INPUT DATA' tab
Expand 'sports-content'
Expand 'sports-metadata'
The idea is to create the new nodes as seen in the below image:
You will note there are five bright white text nodes in the above image, which are not currently in the Win Client.
Hover the mouse over 'sports-metadata'
To the right is a permanent 'cube' icon - this denotes 'Object'
To the right - but only when the node is highlighted, an icon appears, now hover the mouse over the icon:
'Create a new user input node under this element'
You will notice a '@' icon against some of the nodes - this denotes 'Value'. User Input Nodes can be created below 'Objects' but not 'Values'.
Ensure you are using the 'sports-metadata' icon, click 'Create a new user input node under this element'
A new 'EDIT' pane now appears, with the following fields:
Node Label: New User Input Node
Node Name: new-user-input-node
Input Type: Text
Change the Node Label to: Commentator Name
Change the Node Name to: commentator
Change the Input Type to: Options
In the available 'Option' fields add the following 4 options:
Alistair Bruce-Ball
Steve Wilson
_ ?
<BLANK> (i.e. leave the field empty)
Set the 'Default Value' to: _ ?
TICK the 'Allows Override'
Click 'Save'
Repeating some of the above steps, you now need to create further new user input node.
Ensure you are using the 'sports-metadata' icon, click 'Create a new user input node under this element'
Change the Node Label to: Validate
Change the Node Name to: validate
Change the Input Type to: Bool
Ensure the 'Default Value' is: false
Click 'Save'
The above user input node can be used by an Operator to set true or false, which can then be used to set conditions for certain actions. More will become clear in the following tutorial. You now need two user input nodes to allow an Operator to select the kit a team may be wearing for a match. This is needed to ensure some graphics (i.e. with images of the player) have the same kit being worn by the team.
Ensure you are using the 'sports-metadata' icon, click 'Create a new user input node under this element'
Change the Node Label to: Home Team Kit
Change the Node Name to: homekit
Change the Input Type to: Options
In the available 'Option' fields add the following 5 options:
home
away
third
_ ?
<BLANK> (i.e. leave the field empty)
Set the 'Default Value' to: _ ?
TICK the 'Allows Override'
Click 'Save'
The above is restricted to the home team, now for the away team.
Ensure you are using the 'sports-metadata' icon, click 'Create a new user input node under this element'
Change the Node Label to: Away Team Kit
Change the Node Name to: awaykit
Change the Input Type to: Options
In the available 'Option' fields add the following 5 options:
home
away
third
_ ?
<BLANK> (i.e. leave the field empty)
Set the 'Default Value' to: _ ?
TICK the 'Allows Override'
Click 'Save'
At times there will not be an image of the team kit (including the sponsorship logos etc), i.e. during FA Cup matches. If the kit is not held as an image, the base colour can be set for use within certain graphics - i.e a 'Formation' graphic.
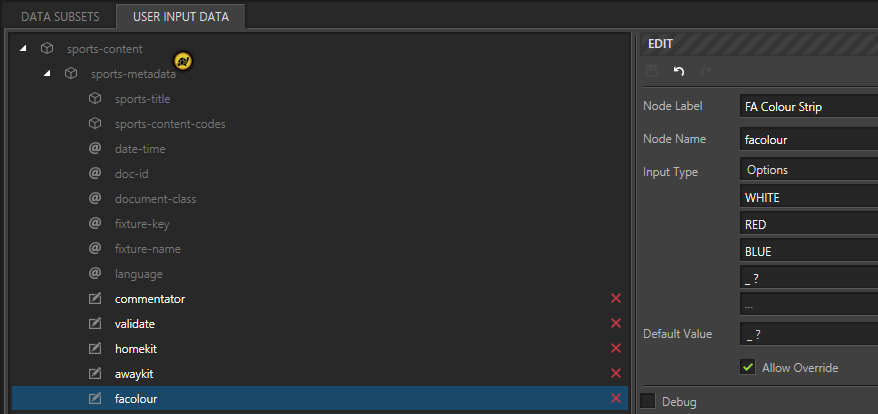
Ensure you are using the 'sports-metadata' icon, click 'Create a new user input node under this element'
Change the Node Label to: FA Colour Strip
Change the Node Name to: facolour
Change the Input Type to: Options
In the available fields add the following 5 options:
WHITE
RED
BLUE
_ ?
<BLANK> (i.e. leave the field empty)
Set the 'Default Value' to: _ ?
TICK the 'Allows Override'
Click 'Save'
The Schema
From the main tabs select: DATA
From the sub-tabs select: SCHEMAS & HOOKS
There are three main panes:
Within SCHEMA make the following selections:
Data Provider: XMLTeam
Target: Production
Schema: soccer event-report
Sample Data: Southampton v Leicester City
Hook Creation
Expand the following nodes below SCHEMA:
sports-content
sports-metadata
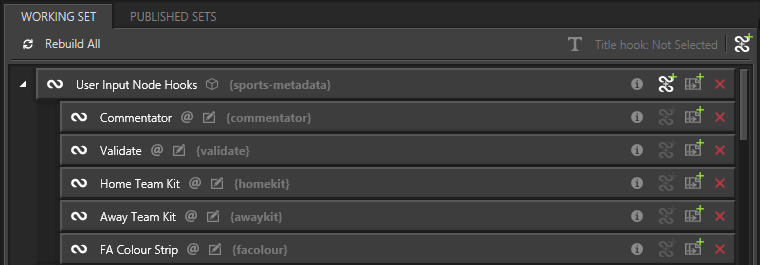
As you can see in the image below, the newly created user input nodes are now available.
Highlight the 'sports-metadata' node
Click 'Create a new hook into this element'
Rename 'User Input Node Hooks'
This will be the parent hook for the following five sub-hooks, which use the newly created User Input Nodes.
Highlight the 'commentator' node
Click 'Create a new hook into this element'
Highlight the 'validate' node
Click 'Create a new hook into this element'
Highlight the 'homekit' node
Click 'Create a new hook into this element'
Highlight the 'awaykit' node
Click 'Create a new hook into this element'
Highlight the 'facolour' node
Click 'Create a new hook into this element'
Hook Evaluation
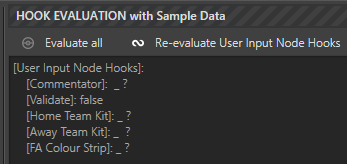
Initially, the evaluation does not return a value for each of the newly created User Input Nodes.
With appropriate steps, the User Input Nodes can be made visible in the Ignition Post Web Client. They can then be altered there, using their options (if available), a tick box (if Boolean was set as the Input Type) and can be overridden (if the 'Allows Override ' option was Ticked).
The Hook Evaluation will then display some data; such as the default values; which can be seen in the image below.
You will manipulate your 'User Input Nodes' in the next tutorial: